
| Operating Scrap Dragon > Main Menu > Back Office > Master Files > Inventory Setup > Inventory Buttons > Button Maker (inventory) |
Now that the menu name and the menu pages have been defined, you will be able to make menu page buttons. The final step in the creation of the customized scale screens is performed using the Button Maker. This program allows you to assemble all of the elements that you have previously created into the customized screen that the scale operator will see and use.
Note: You may create Menu Names and Menu Pages on-the-fly in the Button Maker.

Now you can design your button layout, color schemes, menus and sub-menus.
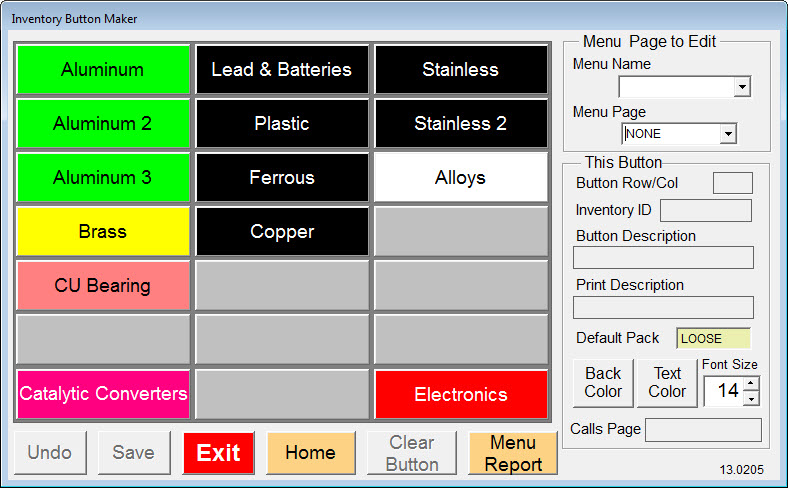
There are four areas on the screen: Button area, This Menu area, This Page area, and processing buttons area.
Start the process by selecting the Menu Name. The home page of the menu will be displayed. If no buttons have been defined for this menu, you will see a blank screen. In the button area, there are twenty one rectangle areas. Each rectangle represents an inventory item button. When you are first building a menu, the button area is blank. There are only the rectangles.
You may want to:
1. Add a button
To add a new button to the grid, touch a blank cell in which you want the button to appear. Your list of available inventory items will be displayed. Find the item you wish to add, touch on it, and then touch the Select button.
The new button will appear in the menu grid using the default background color, text color and font size from the inventory master file. If you do not see the inventory item in the list, you may have forgotten to set it up in the inventory master file.
2. Set/modify the buttons properties
You may edit the properties of any button by clicking on it. You can override the default background color, text color and font size. To set a button to trigger a call to another page or sub-menu, select the sub-menu from the drop down box Calls Page.
3. Remove/replace a button
New buttons can only be added to a blank cell in the grid. Once a button has been placed into the grid, any subsequent selection of that cell of the grid will only permit modification of the characteristics of the button. Therefore, to replace a button, it is first necessary to remove it. Touch the cell to be removed and then touch Clear. After confirming your intentions, the cell will be cleared.
4. Create & modify a sub-menu Add a button
Create & modify a sub-menu To switch to another menu page (or sub menu) go to the drop down box Menu Page. The drop down list will be choices which you set up in the Button Menu Pages. Once you have selected a choice from the list it will be displayed as the current menu page.
Touch the Home button at any time to return to your main menu.
Menu Area
This section of the screen let's you select the Menu Name and Menu Page that you will be working on. This Button area shows details about the currently selected button. The Button Row and Column is displayed. R1C would be row 1, button 3. This area also the Inventory Code and Printed ticket description. You have the option of changing the background color, the text color and the font size. If this button will be used to call another page, the Calls Page drop-down is available. After creating your buttons, touch the Save button to save your information, or the Undo button to NOT save the information.
Menu Report
This Menu Report button prints a report listing the buttons for the menu.